Welcome to LanDen Labs
Source Code, Tools, Developer Notes and Performance Metrics
Source Code, Tools, Developer Notes and Performance Metrics
landenlabs.com
landenlabs.com
 |
Download C# - ColorMatrix v1.5: colormatrix C# source code and executables (xp32/net3.5): |
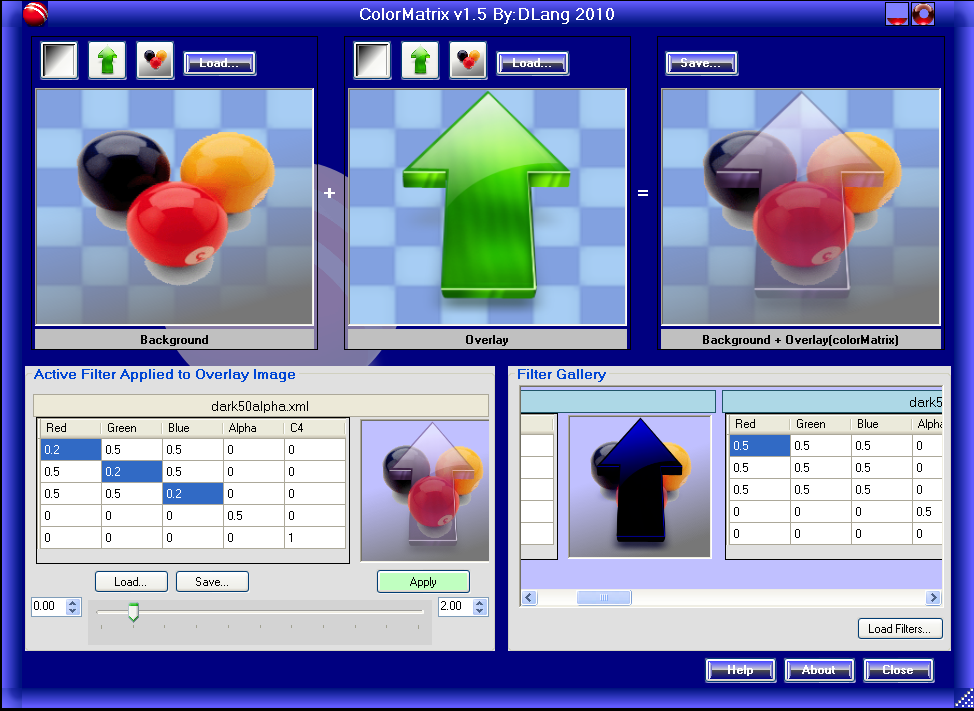
This C# application demonstrates the effect of using the ColorMatrix operator on an image. This program contains several sample matrix filters which you can select and modify. The top portion of the program interface contains three images. A background image, an overlay and the result of applying the color matrix on the overlay rendered on top of the background image. Each of the three panels display their image over a checkerboard background to make it easier to see partial transparent areas (alpha < 255). The bottom section of the interface shows the active color matrix filter on the left and a gallery of pre-built filters on the right.
    float[][] dataArray;    // fill with filter values...
    float gamma = 1.0f;     // no change in gamma
    ImageAttributes imageAttributes = new ImageAttributes();
    imageAttributes.ClearColorMatrix();
    imageAttributes.SetColorMatrix(new ColorMatrix(dataArray),
        ColorMatrixFlag.Default, ColorAdjustType.Bitmap);
    imageAttributes.SetGamma(gamma, ColorAdjustType.Bitmap);

    Rectangle rect = new Rectangle(Point.Empty, image.Size);
    g.DrawImage(image, rect, 0, 0, image.Width, image.Height, GraphicsUnit.Pixel, imageAttributes);
As an image is rendered using the color matrix, each pixel color channel (Red, Green, Blue, Alpha) is transformed by the color matrix. The color matrix transformation executes several math operations on the pixel color.
out(r,g,b,a) = (in(r,g,b,a)/255 * matrix_scale + matrix_offset) * 255
The color matrix is applied to every pixel in the image as it is drawn into the graphics buffer. The following figure shows how a single source pixel is converted to a single destination pixel. Futher down I show specific sample matrix filters.
| Source | Matrix | Destination | |||||||||||||||||||||||||||||||||||
| * |
| = |
|

If you change cells, press the Apply button to apply the new matrix to the overlay image. If you use the slider bar, it will automatically apply the changes.
In all of these examples, the color matrix is only applied to the 2nd image (overlay). The first image is the background, second is the overlay, and third is the result of drawing the overlay with the color matrix over the background image.
The 4 numbers under the source column is a sample Red,Green,Blue,Alpha pixel value. The 4 numbers under the destination column is the result of applying the matrix to the sample source pixel.
| Source | Matrix | Destination | |||||||||||||||||||||||||||||||||||||||||||||||
| * |
| = |
|
|
| Source | Matrix | Destination | ||||||||||||||||||||||||||||||||||||||||||||||
| * |
| = |
|
|
| Source | Matrix | Destination | ||||||||||||||||||||||||||||||||||||||||||||||
| * |
| = |
|
|
Example with Alpha=60%:
| Overlay | Background | Equation | Result | |
| Red | 10 | 20 | 10*0.6 + 20*0.4 | 14 |
| Green | 20 | 20 | 20*0.6 + 20*0.4 | 20 |
| Blue | 30 | 20 | 30*0.6 + 20*0.4 | 26 |
| Source | Matrix | Destination | ||||||||||||||||||||||||||||||||||||||||||||||
| * |
| = |
|
|
| Source | Matrix | Destination | ||||||||||||||||||||||||||||||||||||||||||||||
| * |
| = |
|
|
// Attach the embedded html resource
Assembly a = Assembly.GetExecutingAssembly();
Stream htmlStream = a.GetManifestResourceStream("ColorMatrix_ns.colormatrix.html");
this.webBrowser.DocumentStream = htmlStream;
<img src="data:image/jpg;base64,......." alt="image.jpg" />
<img src="image.jpg" alt="image.jpg" />
<img src="data:image/jpg;base64,......." alt="image.jpg" />
<img src="data:image/jpg;base64,......." alt="image.jpg" />
The base64 image is a text file which you can open with your favorite text editor and paste into your html file. Here is a sample of a few lines of a base64 encoded image:
For more exmples look at the colormatrix.html file which is part of the Visual Studio project for this program.

The code to implement the animation does the following:
Here is the code which grabs an image of the dialog being animated:
public Bitmap MakeScreenImage()
{
    Bitmap image = new Bitmap(this.Width, this.Height);
    this.DrawToBitmap(image, new Rectangle(Point.Empty, image.Size));
    image.MakeTransparent(this.TransparencyKey);
    return image;
}
Here is the code to rotate the image capture using the code above:
private Bitmap rotateImage(Bitmap b, Size size, float angle, float scale, Image prevImage)
{
    // Create a new empty bitmap to hold rotated image
    Bitmap returnBitmap;
    if (prevImage == null)
        returnBitmap = new Bitmap(size.Width, size.Height);
    else
        returnBitmap = new Bitmap(prevImage, size.Width, size.Height);

    // Make a graphics object from the empty bitmap
    Graphics g = Graphics.FromImage(returnBitmap);
    if (prevImage == null)
        g.Clear(Color.Transparent);
    g.SmoothingMode = SmoothingMode.HighSpeed;

    Size deltaSize = size - b.Size;
    g.TranslateTransform((float)deltaSize.Width / 2, (float)deltaSize.Height / 2);

    // Move rotation point to center of image
    g.TranslateTransform((float)b.Width / 2, (float)b.Height / 2);
    // Rotate
    g.RotateTransform(angle);
    // Move origin back
    g.TranslateTransform(-(float)b.Width / 2, -(float)b.Height / 2);
    // Draw passed in image onto graphics object
    g.ScaleTransform(scale, scale);
    g.DrawImage(b, new Point(0, 0));
    return returnBitmap;
}
Next I create a tableLayout object with 3 columns and 3 rows.

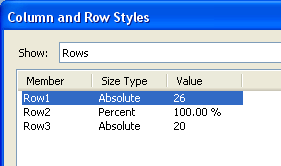
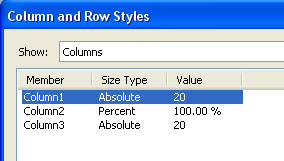 The top and bottom row and left and right columns were set to 20 absolute size.
I made the top a little bigger so I could place icons on the top row, such as the minimize and maximize and program icon.
The center row and column was set to 100% size to allow the center cell to resize.
The top and bottom row and left and right columns were set to 20 absolute size.
I made the top a little bigger so I could place icons on the top row, such as the minimize and maximize and program icon.
The center row and column was set to 100% size to allow the center cell to resize.
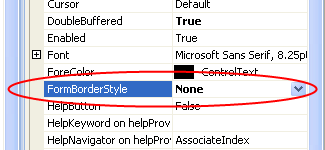
The rest of the work is to attach panels to the four edges and four corner zones of the table layout. Each panel gets an image and optionally you can attach mouse enter, leave and move handlers to support resizing or moving the dialog. You place all of your user interface components on a panel attached to the center zone. See MainForms.cs for examples of the mouse handlers.
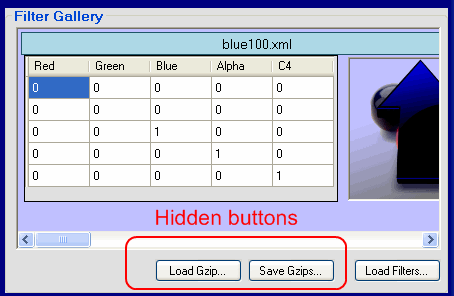 With the additional buttons you can create your own matrix samples save them to disk, reload them into the gallery.
Once the gallery is populated you can press the save button to make a gzip'd file to embedded into the project.
With the additional buttons you can create your own matrix samples save them to disk, reload them into the gallery.
Once the gallery is populated you can press the save button to make a gzip'd file to embedded into the project.
        private void saveFiltersBtn_Click(object sender, EventArgs e)
        {
            if (saveFilterDialog.ShowDialog() == DialogResult.OK)
            {
                Stream fileStream = File.OpenWrite(saveFilterDialog.FileName);
                GZipStream compressStream = new GZipStream(fileStream, CompressionMode.Compress, false);

                BinaryFormatter bFormatter = new BinaryFormatter();

                foreach (Control control in filterFlow.Controls)
                {
                    FilterGrid fg = (FilterGrid)control;
                    bFormatter.Serialize(compressStream, fg.Label);
                    bFormatter.Serialize(compressStream, fg.Source);
                    bFormatter.Serialize(compressStream, fg.Image);
                }

                compressStream.Close();
            }

        }

        private void LoadCompressedFiltersBtn_Click(object sender, EventArgs e)
        {
            if (loadFilterDialog.ShowDialog() == DialogResult.OK)
            {
                Stream fileStream = File.OpenRead(loadFilterDialog.FileName);
                LoadCompressedFilters(fileStream);
            }
        }


