Right side using ViewFlipper


| Source code | android-flip-animation-src.zip |
| Android APK (min API 17, SDK 4.2) zip'd | android-flip-animation-apk.zip |
| Android APK (min API 17, SDK 4.2) | android-flip-animation.apk |
| WARNING - Chrome on 4.2 will get stuck trying to download APK, use a different browser like FireFox | |
| GitHub source | https://github.com/landenlabs/all_Flip |
If you place text on the faces of a cube or prism and rotate it around its center axis, the rotation will require additional vertical space. If you need your rotation to fit inside a set space you need to distort the faces as they rotate and/or clip them.
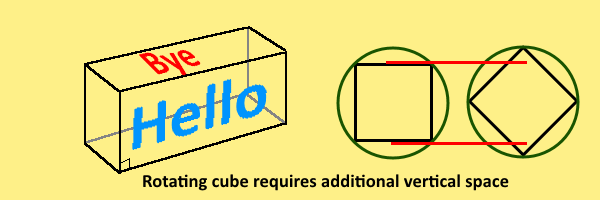
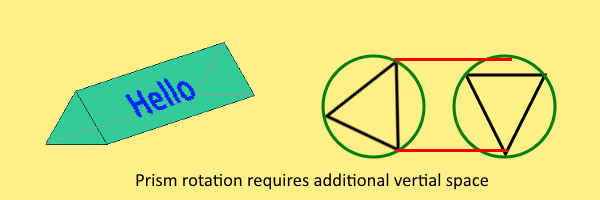
Move mouse left and right to spin Box and Triangle.
Red circle diameter 141.421 = 200 * cos(45)
Orange circle diameter 115.47 = 200 * sin(60) * 2/3
| 200 per side Square | 200 per side Equilateral Triangle. |
There are three main techniques to rotate a view using an animation:
To rotate a set of views you can manipulate each view two ways:
** The above can be merged with Translation to get a cube look
Each of these three approaches can generate similar results. Details below will explore each approach.
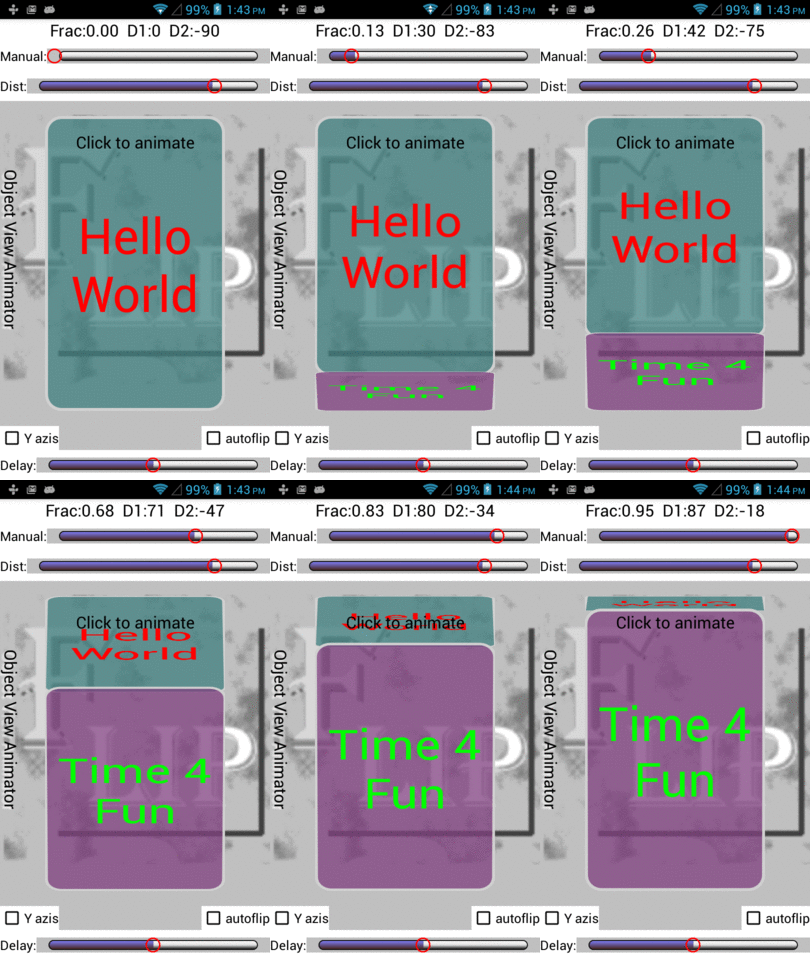

The Object Animator is the easiest way and works on all View objects. The only requirements is a stack of View objects. The easiest way to create a stack of view objects is to place views in a RelativeLayout. See view1, view2 and view3 objects. All three of these views are in a stack with the last on top. The fourth view oject is a TextView used to display the "Click to Animate" message and is the global click surface to capture the click (touch) action to start a single animation. This last view is not part of the animation.
 Example View stack use by ObjectAnimator


    <RelativeLayout
        android:layout_width="match_parent"
        android:layout_height="wrap_content"
        android:layout_above="@+id/yaxis"
        android:layout_below="@+id/camaraDist"
        android:layout_marginBottom="20dp"
        android:layout_marginLeft="60dp"
        android:layout_marginRight="60dp"
        android:layout_marginTop="20dp"
        android:orientation="vertical">

        <TextView
            android:id="@+id/view1"
            android:layout_width="match_parent"
            android:layout_height="match_parent"
            android:background="@drawable/round_border1"
            android:gravity="center"
            android:text="Hello World"
            android:textColor="#ff0000"
            android:textSize="60sp" />

        <TextView
            android:id="@+id/view2"
            android:layout_width="match_parent"
            android:layout_height="match_parent"
            android:background="@drawable/round_border2"
            android:gravity="center"
            android:text="Time 4 Fun"
            android:textColor="#00ff00"
            android:textSize="60sp" />

        <TextView
            android:id="@+id/view3"
            android:layout_width="match_parent"
            android:layout_height="match_parent"
            android:background="@drawable/round_border3"
            android:gravity="center"
            android:text="Good Bye"
            android:textColor="#0000ff"
            android:textSize="60sp" />

        <TextView
            android:id="@+id/click_view"
            android:layout_width="match_parent"
            android:layout_height="match_parent"
            android:gravity="center_horizontal"
            android:padding="20dp"
            android:text="Click to animate"
            android:textSize="20sp" />
    </RelativeLayout>
By using two ObjectAnimator's you can rotate two views to give a rotation effect.
   /**
     * Start animation.
     */
    public void animateIt() {

        advance();
        manualAnimation(0);   // Set angle and pivot points

        // Compute begin and end angle (degrees).
        int dir = mIsForward ? 1 : -1;
        float beg1 = 0;
        float beg2 = -END_ANGLE * dir;
        float rot = END_ANGLE * dir;

        // Clear left over state by creating new AnimatorSet
        mAnimatorSet = new AnimatorSet();

        // Select property to manipulate, view object has to have a setXXXX method.
        String parmStr = mRotateYaxis ? "RotationY" : "RotationX";

        // Run both animations in parallel.
        mAnimatorSet
            .play(ObjectAnimator.ofObject(mView1, parmStr, mAngleSync, beg1, beg1 + rot).setDuration(mDurationMsec))
            .with(ObjectAnimator.ofObject(mView2, parmStr, mAngleSync, beg2, beg2 + rot).setDuration(mDurationMsec));
        mAnimatorSet.start();
    }
By adding a Float evaluator you can adjust the animated angle to keep both view far edges in sync. If you don't adjust the angle the rotation will cross.
Float Evaluator to adjust rotation angle

   /**
     * Modify angle so both edges are in sync.
     */
    public class FloatEvaluator implements TypeEvaluator {
        public Float evaluate(float fraction,
            Float startValue,
            Float endValue) {

            // Assume non-zero start is a reverse animation..
            if (startValue != 0)
                fraction = 1 - fraction;

            // Output angle which will produce identical ending point for
            // the opposite edge of the pivoting view, assumes both views
            // are identical size.
            float angle = (float) (Math.acos(1 - fraction) * 180 / Math.PI);
            float percent = angle / END_ANGLE;

            if (startValue != 0)
                percent = 1 - percent;

            float degrees2 = startValue + ((endValue - startValue) * percent);
            return degrees2;
        }
    }
Similar code can be used to manipulate an ImageView's matrix directly using its setImageMatrix(Matrix matrix) method.
ObjectAnimator on ImageView's imageMatrix

/**
  * Start animation.
  */
public void animateIt() {

    setPivotAndCamera();
    mIsForward = !mIsForward;

    // For imageMatrix to work you must also set scaleType to Matrix.
    ObjectAnimator anim1 = ObjectAnimator.ofObject(
            mView1,
            "imageMatrix",  // Property of imageView
            new MatrixEvaluator(),
            mRotation1.getMatrix(0), mRotation1.getMatrix(1));
    anim1.setDuration(mDurationMsec);

    ObjectAnimator anim2 = ObjectAnimator.ofObject(
            mView2,
            "imageMatrix",  // Property of imageView
            new MatrixEvaluator(),
            mRotation2.getMatrix(0), mRotation2.getMatrix(1));
    anim2.setDuration(mDurationMsec);

    // Execute two Object animations together.
    AnimatorSet animatorSet = new AnimatorSet();
    animatorSet.play(anim1).with(anim2);
    animatorSet.start();
}
In this case we switch from providing a Float Evaluator to a Matrix Evaluator. The Matrix Evaluator computes the linear interpolation between the starting matrix and the ending matrix. This solution does not adjust the rotation to avoid edge overlap like the first solution. The Matrix Evaluator could be enhanced to perform the same adjustment.
Compute Linear Matrix interpolation

/**
 * Linear interpolation between two matrix.
 */
public class MatrixEvaluator implements TypeEvaluator {
    public Matrix evaluate(float fraction,
        Matrix startValue,
        Matrix endValue) {
        float[] startEntries = new float[9];
        float[] endEntries = new float[9];
        float[] currentEntries = new float[9];

        startValue.getValues(startEntries);
        endValue.getValues(endEntries);

        for (int i = 0; i < 9; i++)
            currentEntries[i] = (1 - fraction) * startEntries[i]
                + fraction * endEntries[i];

        Matrix matrix = new Matrix();
        matrix.setValues(currentEntries);
        return matrix;
    }
}
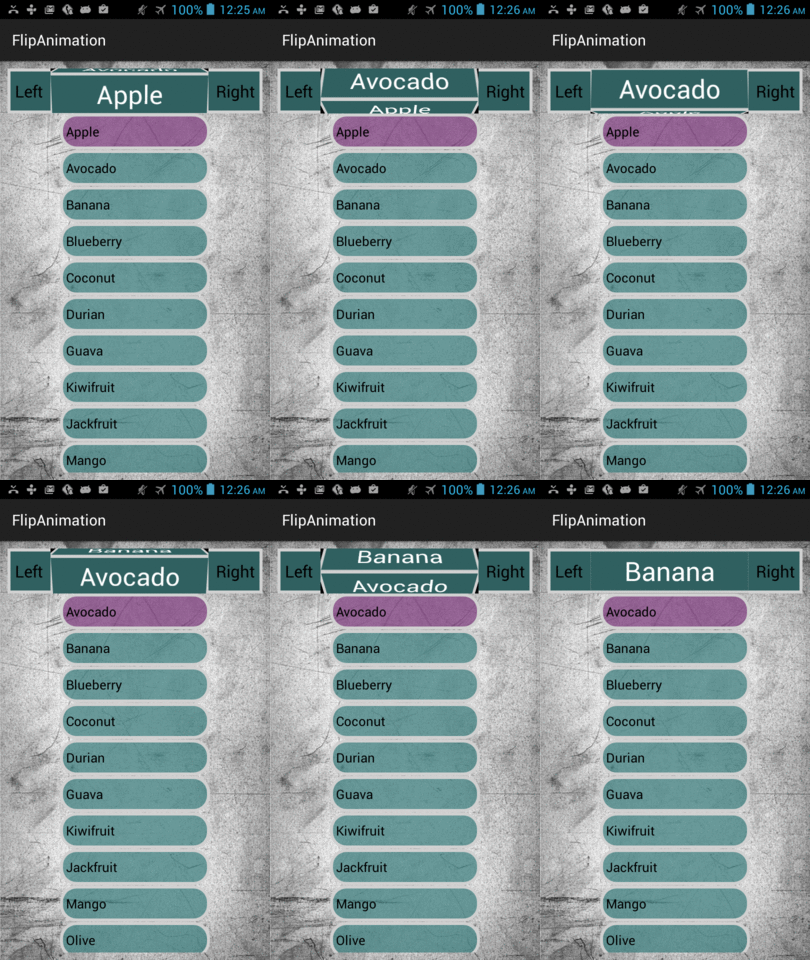
Below is an example using two object animations per view to Rotate and Translate to give a more cube style rotation.
/**
 * Demonstrate rotating Two Views using  ObjectAnimators (cube look)
 * Using rotation and translation  (R & T).  See ActivityObjAnimListR for alternate look.
 *
 * @author Dennis Lang (LanDen Labs)
 * @see <a href="https://landenlabs.com//android/index-m.html"> author's web-site </a>
 */
public class ActivityObjAnimListRT extends ActionBarActivity {

    // ---- Timer ----
    private Handler m_handler = new Handler();
    private int mDurationMsec = 3000;
    private Runnable m_updateElapsedTimeTask = new Runnable() {
        public void run() {
            animateIt();
            m_handler.postDelayed(this, mDurationMsec);   // Re-execute after msec.
        }
    };

    private final List<String> mListStrings = Arrays.asList("Apple", "Avocado", "Banana",
        "Blueberry", "Coconut", "Durian", "Guava", "Kiwifruit",
        "Jackfruit", "Mango", "Olive", "Pear", "Sugar-apple");

    // ---- Local Data ----
    private int mCurrentIdx = 0;
    private TextView mTitle1;
    private TextView mTitle2;
    private ListView mListView;

    // ---- Local data ----
    private final TypeEvaluator<Float> mFloatEval = new FloatEvaluator();
    private final TypeEvaluator<Integer> mIntEval = new IntEvaluator();

    @Override
    protected void onCreate(Bundle savedInstanceState) {
        super.onCreate(savedInstanceState);
        setContentView(R.layout.obj_anim_list);
        setup();
        m_handler.postDelayed(m_updateElapsedTimeTask, mDurationMsec);
    }

    public void setup() {
        mTitle1 = Ui.viewById(this, R.id.title1);
        mTitle2 = Ui.viewById(this, R.id.title2);

        mListView = Ui.viewById(this, R.id.listview);
        /*  R.layout.list_row is ListView replacement for android.R.layout.simple_list_item_1
              because  ListView's  android:listSelector="@drawable/round_border_sel"
              fails to set state. Moving selector into list_row solves the problem.
              See advance()
        */
        mListView.setAdapter(new ArrayAdapter<>(this, R.layout.list_row, mListStrings));
        mListView.setOnItemClickListener(new AdapterView.OnItemClickListener() {
            public void onItemClick(AdapterView<?> parent, View view,
                                    int position, long id) {
                mCurrentIdx = position;
            }
        });
    }

    /**
     * Start animation.
     */
    public void animateIt() {
        advance();

        // Compute begin and end angle (degrees).
        final float END_ANGLE = 90.0f;
        float beg1 = 0;
        float beg2 = END_ANGLE;
        float rot = -END_ANGLE;

        final float pivotPos = 0.5f;
        mTitle1.setPivotX(mTitle1.getWidth() * pivotPos);
        mTitle2.setPivotX(mTitle2.getWidth() * pivotPos);
        mTitle1.setPivotY(0);
        mTitle2.setPivotY(mTitle2.getHeight());

        // Build AnimatorSet to run all four animations in parallel.
        AnimatorSet animatorSet = new AnimatorSet();
        String rotParm = "RotationX";
        String tranParm = "TranslationY";
        animatorSet
                .play(ObjectAnimator.ofObject(mTitle1, rotParm, mFloatEval, beg1, beg1 + rot).setDuration(mDurationMsec))
                .with(ObjectAnimator.ofObject(mTitle1, tranParm, mIntEval, 0, mTitle1.getHeight()).setDuration(mDurationMsec))
                .with(ObjectAnimator.ofObject(mTitle2, rotParm, mFloatEval, beg2, beg2 + rot).setDuration(mDurationMsec))
                .with(ObjectAnimator.ofObject(mTitle2, tranParm, mIntEval, -mTitle2.getHeight(), 0).setDuration(mDurationMsec));
        animatorSet.start();
    }

    /**
     * Advance to next panel pair to animate, set their text.
     */
    private void advance() {
        // Swap views
        TextView title1 = mTitle1;
        mTitle1 = mTitle2;
        mTitle2 = title1;

        // Using custom ListView Adapter layout to provide a selector inside
        //   row layout so view has persistent checked (or active) state.
        //   Note: If object is not checkable (like TextView) it sets its active state.
        //   so selector should fire on state_checked or state_activated.
        mListView.setItemChecked(mCurrentIdx, true);

        // Make sure selected item is in view.
        mListView.setSelection(mCurrentIdx);

        // Advance and set data in views.
        mTitle1.setText(mListStrings.get(mCurrentIdx));
        mCurrentIdx = (mCurrentIdx + 1) % mListStrings.size();
        mTitle2.setText(mListStrings.get(mCurrentIdx));
    }

    /**
     * Interpolate angle
     */
    public class FloatEvaluator implements TypeEvaluator<Float> {
        public Float evaluate(float fraction, Float startValue,  Float endValue) {
            return startValue + ((endValue - startValue) * fraction);
        }
    }

    /**
     * Interpolate translation
     */
    public class IntEvaluator implements TypeEvaluator<Integer> {
        public Integer evaluate(float fraction, Integer startValue,  Integer endValue) {
            float numF = startValue + ((endValue - startValue) * fraction);
            return (int)numF;
        }
    }
}
By pulling Camera Z out the rotation will jump less and
becomee more like the ObjectAnimator motion. By moving the
camera in close you get a more obvious cube look.
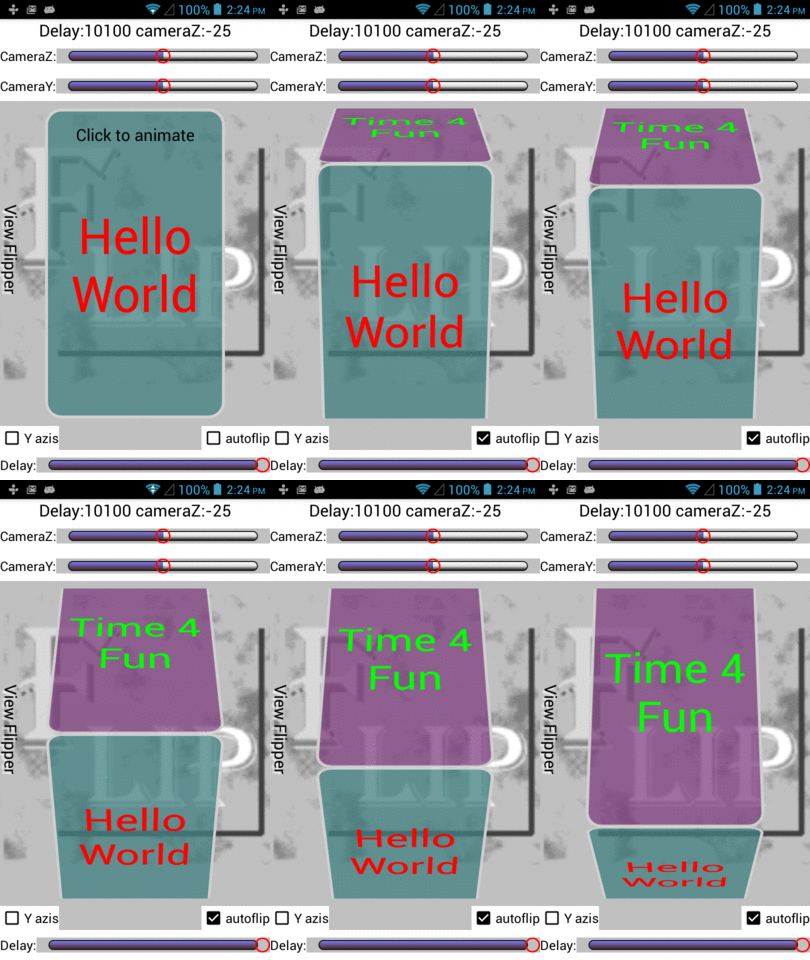

Demonstrate Translation and Rotation applied to two panels.Move mouse to see how the two panels will move.
This is a side view with you looking down at the top as the purple panel moves to the right while the green panel moves in place.
The View Flipper can perform the rotation two ways.
1. Directly using the view rotation methods:
View Rotation Methods
setRotationX(float)
setRotationY(float)
setPivotX(float)
setPivotY(float)
setCameraDistance(float)
       /**
         * Apply rotation directly to View.
         *
         * @param interpolatedTime Value from interpolation [0 to 1].
         * @param trans            Holds matrix.
         */
        private void applyTransformationView(float interpolatedTime, Transformation trans) {
            final float fromDegrees = mFromDegrees;
            float degrees = fromDegrees + ((mToDegrees - fromDegrees) * interpolatedTime);

            float height = mView.getHeight();
            float width = mView.getWidth();

            mView.setCameraDistance(1280 + mCameraPos[2] * -100);

            mView.setPivotX(mPivotXf * width);
            mView.setPivotY(mPivotYf * height);
            if (mAxis == ROTATION_X) {
                mView.setRotationX(degrees);
                mView.setTranslationY((interpolatedTime + mTransYf) * height * mDir);
            } else {
                mView.setRotationY(degrees);
                mView.setTranslationX((interpolatedTime + mTransXf) * width * mDir);
            }
        }
2. Second way is to manipulate the View object's matrix
       /**
         * Apply Transform using Camera for 3d perspective rotation.
         *
         * @param interpolatedTime Value from interpolation [0 to 1].
         * @param trans            Holds matrix.
         */
        private void applyTransformationCamera(float interpolatedTime, Transformation trans) {
            final float fromDegrees = mFromDegrees;
            float degrees = fromDegrees + ((mToDegrees - fromDegrees) * interpolatedTime);

            float height = mView.getHeight();
            float width = mView.getWidth();

            final Matrix matrix = trans.getMatrix();
            mCamera.save();
            mCamera.setLocation(mCameraPos[0], mCameraPos[1], mCameraPos[2]);

            if (mAxis == ROTATION_X) {
                mCamera.rotateX(degrees);
            } else {
                mCamera.rotateY(degrees);
            }

            mCamera.getMatrix(matrix);
            mCamera.restore();

            if (mAxis == ROTATION_X) {
                matrix.postTranslate(0, (interpolatedTime + mTransYf) * height * mDir);
            } else {
                matrix.postTranslate((interpolatedTime + mTransXf) * width * mDir, 0);
            }

            float pivotX = mPivotXf * width;
            float pivotY = mPivotYf * height;
            matrix.preTranslate(-pivotX, -pivotY);
            matrix.postTranslate(pivotX, pivotY);
        }
The View Flipper requires the most code. You need to attach animations to each View provided by the ViewFlipper and one of the transforms shown above.
/**
 * Flip to the next view of the {@code ViewAnimator}'s subviews.
 * A call to this method will initiate a {@link FlipAnimation} to show the next View.
 * If the currently visible view is the last view, flip direction will be reversed for this transition.
 *
 * @param viewAnimator the {@code ViewAnimator}
 * @param dir          the direction of flip
 * @param duration     the transition duration in milliseconds
 * @return direction  hit end - flips direction.
 */
public static FlipDirection flipTransition(final ViewAnimator viewAnimator, FlipDirection dir,
        long duration, float[] cameraPos) {

    final int currentIndex = viewAnimator.getDisplayedChild();
    final int nextIndex = (currentIndex + 1) % viewAnimator.getChildCount();

    final View fromView = viewAnimator.getCurrentView();
    final View toView = viewAnimator.getChildAt(nextIndex);

    Animation[] animc = flipAnimation(fromView, toView, dir, duration, new LinearInterpolator(), cameraPos);

    viewAnimator.setOutAnimation(animc[0]);
    viewAnimator.setInAnimation(animc[1]);

    viewAnimator.showNext();

    return (nextIndex < currentIndex) ? dir.theOtherDirection() : dir;
}

/**
 * Create a pair of {@link FlipAnimation} that can be used to flip 3D transition from {@code fromView}
 * to {@code toView}.
 * A typical use case is with {@link ViewAnimator} as an out and in transition.
 *
 * NOTE: Avoid using this method. Instead, use {@link #flipTransition}.
 *
 * @param fromView     the view transition away from
 * @param toView       the view transition to
 * @param dir          the flip direction
 * @param duration     the transition duration in milliseconds
 * @param interpolator the interpolator to use (pass {@code null} to use the
 *  {@link AccelerateInterpolator} interpolator)
 * @return animation pair
 */
public static Animation[] flipAnimation(final View fromView, final View toView, FlipDirection dir,
    long duration, Interpolator interpolator, float[] cameraPos) {

    int dirSign = dir.getDirSign();
    int axis;
    float[] inRotation, outRotation;
    float[] inOriginF, outOriginF;
    float[] inPivotF, outPivotF;


    if (dir == FlipDirection.BOTTOM_TOP || dir == FlipDirection.TOP_BOTTOM) {
        axis = FlipAnimation.ROTATION_X;
        inRotation = new float[]{0, -90};
        outRotation = new float[]{90, 0};
        inOriginF = new float[]{0, 0};
        outOriginF = new float[]{0, -1};
        inPivotF = new float[]{0.5f, 0};
        outPivotF = new float[]{0.5f, 1};
    } else {
        axis = FlipAnimation.ROTATION_Y;
        inRotation = new float[]{0, 90};
        outRotation = new float[]{-90, 0};
        inOriginF = new float[]{0, 0};
        outOriginF = new float[]{-1, 0};
        inPivotF = new float[]{0, 0.5f};
        outPivotF = new float[]{1, 0.5f};
    }

    Animation[] result = new Animation[2];

    FlipAnimation outFlip = new FlipAnimation(
        inRotation,     // Rotation from -> to
        inOriginF,      // Origin (fraction of view dimensions)
        inPivotF,       // Pivot (fraction of view dimensions)
        cameraPos, axis, dirSign, fromView);
    outFlip.setDuration(duration);
    outFlip.setFillAfter(true);
    outFlip.setInterpolator(interpolator);
    result[0] = outFlip;

    FlipAnimation inFlip = new FlipAnimation(
        outRotation,    // Rotation from -> to
        outOriginF,     // Origin (fraction of view dimensions)
        outPivotF,      // Pivot (fraction of view dimensions)
        cameraPos, axis, dirSign, toView);
    inFlip.setDuration(duration);
    inFlip.setFillAfter(true);
    inFlip.setInterpolator(interpolator);
    result[1] = inFlip;

    return result;
}
 Layout defining ViewFlipper and the View children

<ViewFlipper
    android:id="@+id/viewFlipper"
    android:layout_width="wrap_content"
    android:layout_height="0dp"
    android:layout_above="@id/yaxis"
    android:layout_below="@id/cameraYpos"
    android:layout_centerInParent="true"
    android:layout_gravity="center"
    android:layout_marginBottom="10dp"
    android:layout_marginLeft="60dp"
    android:layout_marginRight="60dp"
    android:layout_marginTop="10dp"
    android:layout_weight="1"
    android:addStatesFromChildren="true"
    android:clickable="true"
    android:gravity="center">

    <TextView
        android:layout_width="match_parent"
        android:layout_height="match_parent"
        android:layout_centerInParent="true"
        android:layout_gravity="center"

        android:background="@drawable/round_border1"
        android:clickable="true"
        android:gravity="center"
        android:text="Hello World"
        android:textColor="#ff0000"
        android:textSize="60sp"/>

    <TextView
        android:layout_width="match_parent"
        android:layout_height="match_parent"
        android:layout_centerInParent="true"
        android:layout_gravity="center"

        android:background="@drawable/round_border2"
        android:clickable="true"
        android:gravity="center"
        android:text="Time 4 Fun"
        android:textColor="#00ff00"
        android:textSize="60sp"/>

    <TextView
        android:layout_width="match_parent"
        android:layout_height="match_parent"
        android:layout_centerInParent="true"
        android:layout_gravity="center"

        android:background="@drawable/round_border3"
        android:clickable="true"
        android:gravity="center"
        android:text="Good Bye"
        android:textColor="#0000ff"
        android:textSize="60sp"/>

</ViewFlipper>
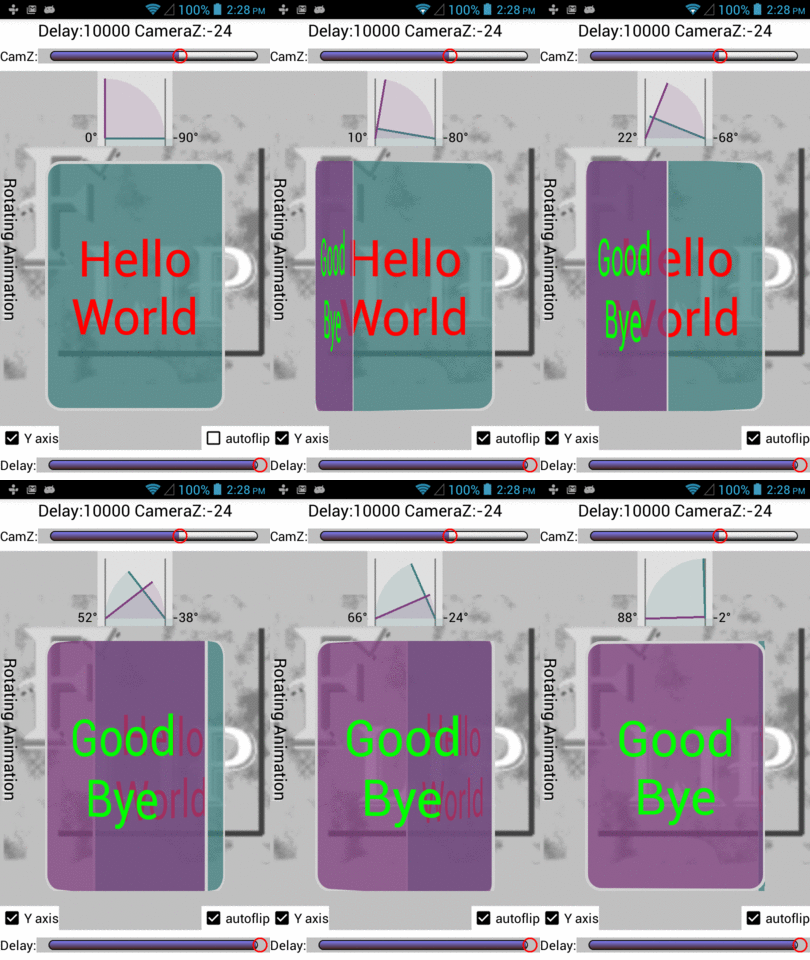
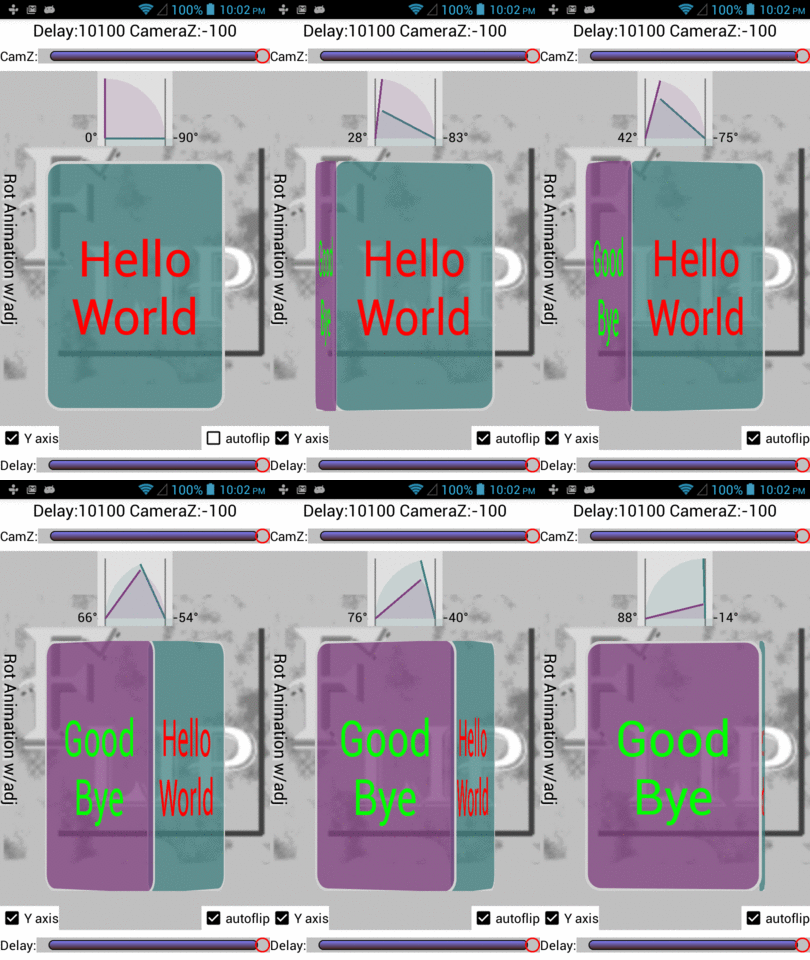
The left animation is standard linear interpolation of the rotation angle.
The right animation is adjust to keep the far edges in sync.
Using a basic Animation is similar to the first solution using an ObjectAnimator. You need to create an Anmation objects and attach it to a pair of View objects. Once again it is easiest to use a RelativeLayout to create a stack of View objects. See XML below.
The following logic shows how to run two Animations in parallel using an AnimationSet. The AnimationSet appears straightforward but there is a trick to get the animation to run multiple times. The trick is to call view.clearAnimation() between runs (see code for details)
/**
 * Called when the activity is first created.
 */
@Override
public void onCreate(Bundle savedInstanceState) {
    super.onCreate(savedInstanceState);
    setContentView(R.layout.rot_animation);

    mView1 = Ui.viewById(this, R.id.view1);
    mView2 = Ui.viewById(this, R.id.view2);

    // Create a helper classes which provide transformation logic.
    mRotation1 = new Flip3dAnimation();
    mRotation2 = new Flip3dAnimation();
}

/**
 * Start animation.
 */
public void animateIt() {
    final float end = 90.0f;

    if (mIsForward) {
        mRotation1.mFromDegrees = 0.0f;
        mRotation1.mToDegrees = end;
        mRotation2.mFromDegrees = -end;
        mRotation2.mToDegrees = 0.0f;
    } else {
        mRotation1.mFromDegrees = end;
        mRotation1.mToDegrees = 0.0f;
        mRotation2.mFromDegrees = 0.0f;
        mRotation2.mToDegrees = -end;
    }

    mIsForward = !mIsForward;

    if (mRotateYaxis) {
        mRotation1.mCenterX = mView1.getWidth();
        mRotation1.mCenterY = mView1.getHeight() / 2.0f;
        mRotation2.mCenterX = 0.0f;
        mRotation2.mCenterY = mView2.getHeight() / 2.0f;
    } else {
        mRotation1.mCenterY = 0.0f; // mView1.getHeight();
        mRotation1.mCenterX = mView1.getWidth() / 2.0f;
        mRotation2.mCenterY = mView1.getHeight();   // 0.0f;
        mRotation2.mCenterX = mView2.getWidth() / 2.0f;
    }

    mRotation1.reset(mView1, mDurationMsec, mCameraZ);
    mRotation2.reset(mView2, mDurationMsec, mCameraZ);
    mRotation2.setAnimationListener(new Animation.AnimationListener() {
        @Override public void onAnimationStart(Animation animation) { }
        @Override public void onAnimationEnd(Animation animation) {
            mSoundShut.start();
        }
        @Override public void onAnimationRepeat(Animation animation) { }
    });

    // Run both animations in parallel.
    AnimationSet animationSet = new AnimationSet(true);
    animationSet.setInterpolator(new LinearInterpolator());
    animationSet.addAnimation(mRotation1);
    animationSet.addAnimation(mRotation2);
    animationSet.start();
}
Sample Transform to keep edges in sync.

@Override
protected void applyTransformation(float interpolatedTime, Transformation trans) {

    // Compute standard angle scaled by interpolation time (value not used)
    float degrees1 = mFromDegrees + ((mToDegrees - mFromDegrees) * interpolatedTime);

    // Compute percent of travel along edge (x-axis) and convert back to angle
    // required to generate this x position so both views will have their outside
    // edge at the same position.
    // Note - View camera z (depth) has a big impact on how the edge meets, overlaps or
    // undershoots. Use a large -80 camera Z to get edges to meet.
    float percent1 = (float)Math.toDegrees(Math.acos(1 - interpolatedTime)) / 90;
    float percent2 = (float)Math.toDegrees(Math.asin(interpolatedTime)) / 90;
    float percent = (mFromDegrees == 0) ? percent1 : percent2;
    float degrees2 = mFromDegrees + ((mToDegrees - mFromDegrees) * percent);

    final Camera camera = mCamera;
    final Matrix matrix = trans.getMatrix();

    camera.save();
    camera.setLocation(0, 0, mCameraZ);

    if (mRotateYaxis)
        camera.rotateY(degrees2);
    else
        camera.rotateX(degrees2);

    camera.getMatrix(matrix);
    camera.restore();

    matrix.preTranslate(-mCenterX, -mCenterY);
    matrix.postTranslate(mCenterX, mCenterY);

    final float degree3 = degrees2;
    if (mView == mView1) {
        mDrawView.setAngle1(degree3);
        mAngle1.setText(String.format("%.0f�", degree3));
    } else {
        mDrawView.setAngle2(degree3);
        mAngle2.setText(String.format("%.0f�", degree3));
    }
}
Sample XML with stack of View objects.

<RelativeLayout
     android:id="@+id/view_holder"
     android:layout_width="match_parent"
     android:layout_height="0dp"
     android:layout_above="@id/yaxis"
     android:layout_below="@id/drawView"
     android:layout_marginBottom="20dp"
     android:layout_marginLeft="60dp"
     android:layout_marginRight="60dp"
     android:layout_marginTop="20dp"
     android:layout_weight="1"
     android:orientation="vertical">

     <TextView
         android:id="@+id/view1"
         android:layout_width="match_parent"
         android:layout_height="match_parent"
         android:layout_centerInParent="true"
         android:background="@drawable/round_border1"
         android:clickable="true"
         android:gravity="center"
         android:text="Hello World"
         android:textColor="#ff0000"
         android:textSize="60sp"/>

     <TextView
         android:id="@+id/view2"
         android:layout_width="match_parent"
         android:layout_height="match_parent"
         android:layout_centerInParent="true"
         android:background="@drawable/round_border2"
         android:clickable="true"
         android:gravity="center"
         android:text="Good Bye"
         android:textColor="#00ff00"
         android:textSize="60sp"/>

     <TextView
         android:id="@+id/click_view"
         android:layout_width="wrap_content"
         android:layout_height="wrap_content"
         android:gravity="center_horizontal"
         android:padding="20dp"
         android:text="Click to animate"
         android:textSize="20sp"
         android:layout_alignParentBottom="true"
         android:layout_alignParentLeft="true"
         android:layout_alignParentRight="true"
         android:layout_alignParentTop="true"/>
</RelativeLayout>
Syntax code highligter provided by https://highlightjs.org